教程 - Kotlin 自定义脚本(Custom Scripting) 入门
最终更新: 2024/03/21
Kotlin 脚本是 实验性功能. 它随时有可能变更或被删除. 请注意, 只为评估和试验目的来使用这个功能. 希望你能通过我们的 问题追踪系统 提供你的反馈意见.
Kotlin 脚本 是这样一种技术, 它能够将 Kotlin 代码作为脚本来运行, 不需要编译并打包为可执行文件.
请观看 KotlinConf'19 大会上 Rodrigo Oliveira 的演讲 实现 Gradle Kotlin DSL, 这个演讲通过示例程序概要介绍 Kotlin 脚本.
在本教程中, 你将会创建一个 Kotlin 脚本项目, 它可以执行任意带 Maven 依赖项的 Kotlin 代码. 你将能够执行下面这样的脚本:
@file:Repository("https://maven.pkg.jetbrains.space/public/p/kotlinx-html/maven")
@file:DependsOn("org.jetbrains.kotlinx:kotlinx-html-jvm:0.7.3")

import kotlinx.html.*
import kotlinx.html.stream.*
import kotlinx.html.attributes.*

val addressee = "World"

print(
    createHTML().html {
        body {
            h1 { +"Hello, $addressee!" }
        }
    }
)
在执行期间, 将会从指定的 Maven 仓库或本地缓存, 解析指定的 Maven 依赖项(这个例子中是 kotlinx-html-jvm), 并在脚本的其它部分中使用.
项目结构
一个最小的 Kotlin 自定义脚本项目包含两个部分:
- 脚本定义(Script Definition) – 一组参数和配置, 定义这个脚本类型应该如何识别, 处理, 编译, 以及运行.
- 脚本主机(Scripting Host) – 一个应用程序或组件, 负责处理脚本的编译和执行 – 实际运行这个类型的脚本.
考虑到这点, 最好将项目分为 2 个模块.
开始前的准备工作
下载并安装 IntelliJ IDEA 的最新版.
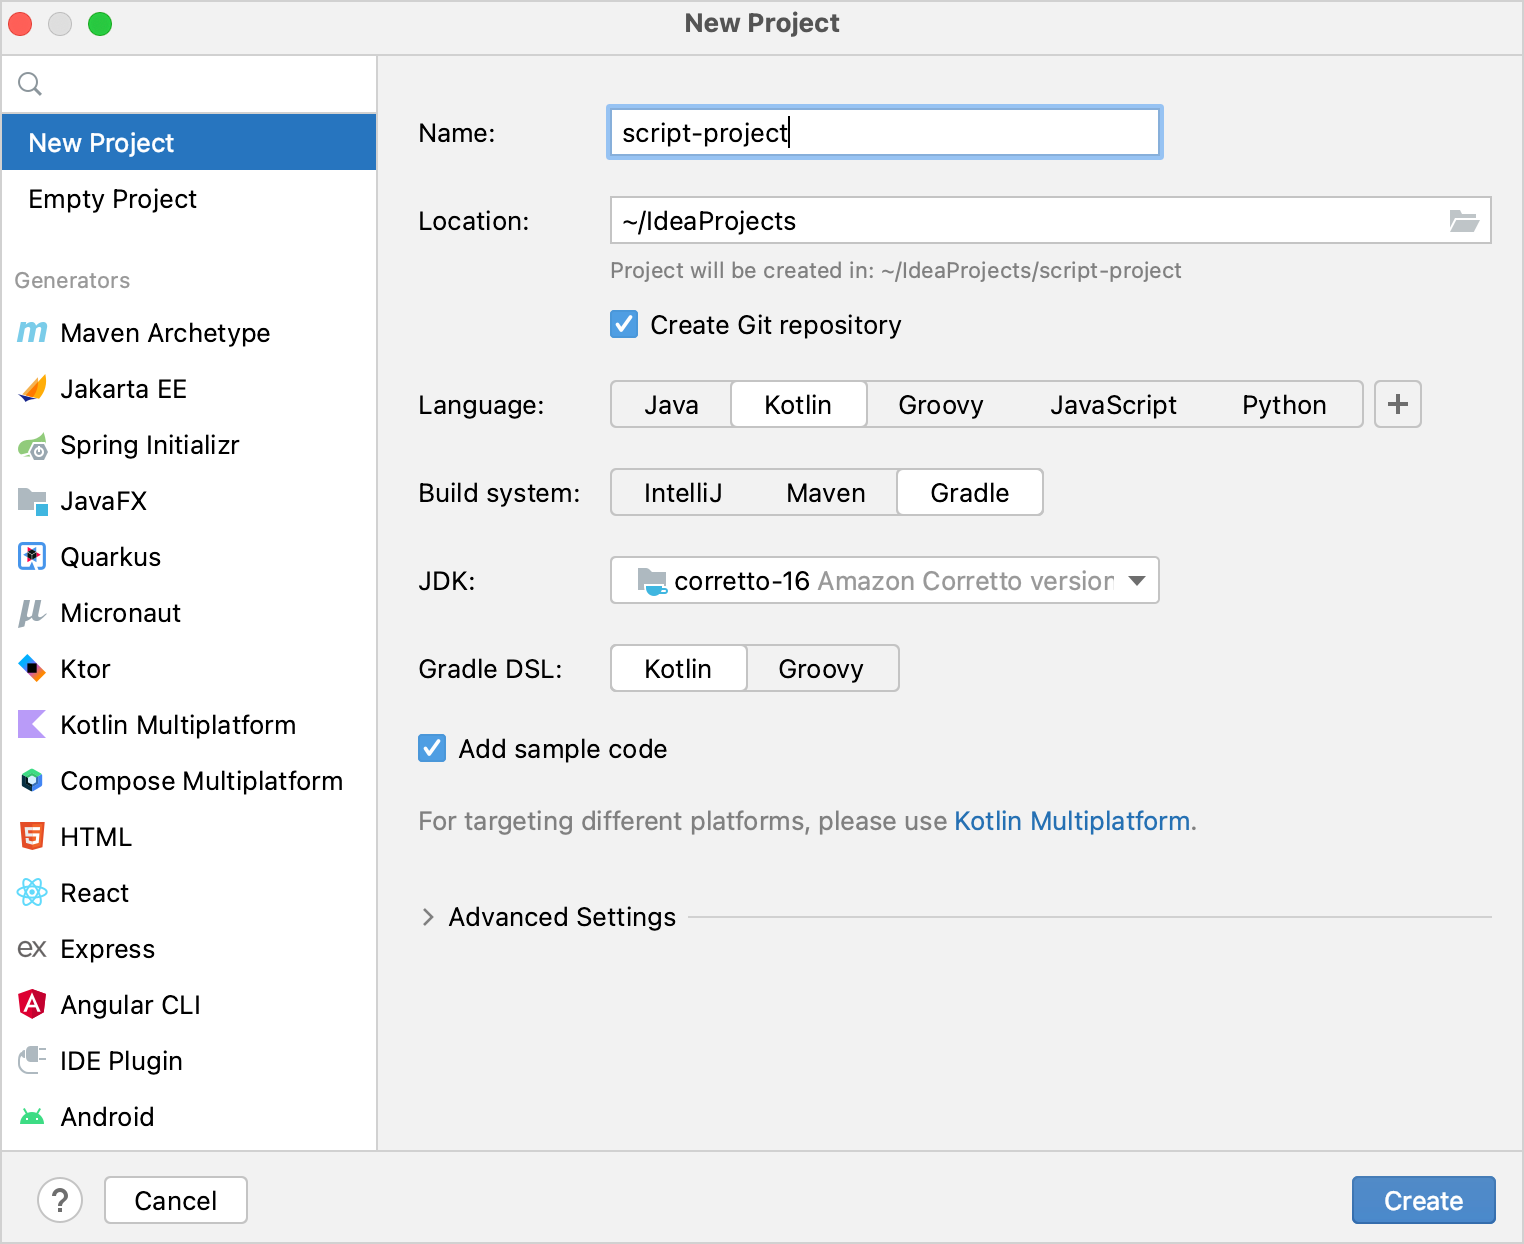
创建一个项目
- 在 IntelliJ IDEA 中, 选择 File | New | Project.
- 在左侧面板中, 选择 New Project.
-
输入新项目名称, 如果需要, 修改它的位置.
可以选择 Create Git repository 选择框, 将新项目添加到源代码版本管理系统. 你也可以在之后的任何时候进行这个工作.
- 在 Language 列表中, 选择 Kotlin.
- 选择 Gradle 构建系统.
- 在 JDK 列表中, 选择你的项目中希望使用的 JDK.
- 如果在你的计算机上已经安装了 JDK, 但没有在 IDE 中定义, 请选择 Add JDK, 并指定 JDK Home 目录的路径.
- 如果你的计算机上没有安装需要的 JDK, 请选择 Download JDK.
- 请为 Gradle DSL 选择 Kotlin 或 Gradle 语言 .
- 点击 Create.
添加脚本模块
现在你已经有了一个空的 Kotlin/JVM Gradle 项目. 下面我们添加需要的模块, 脚本定义模块和脚本主机模块:
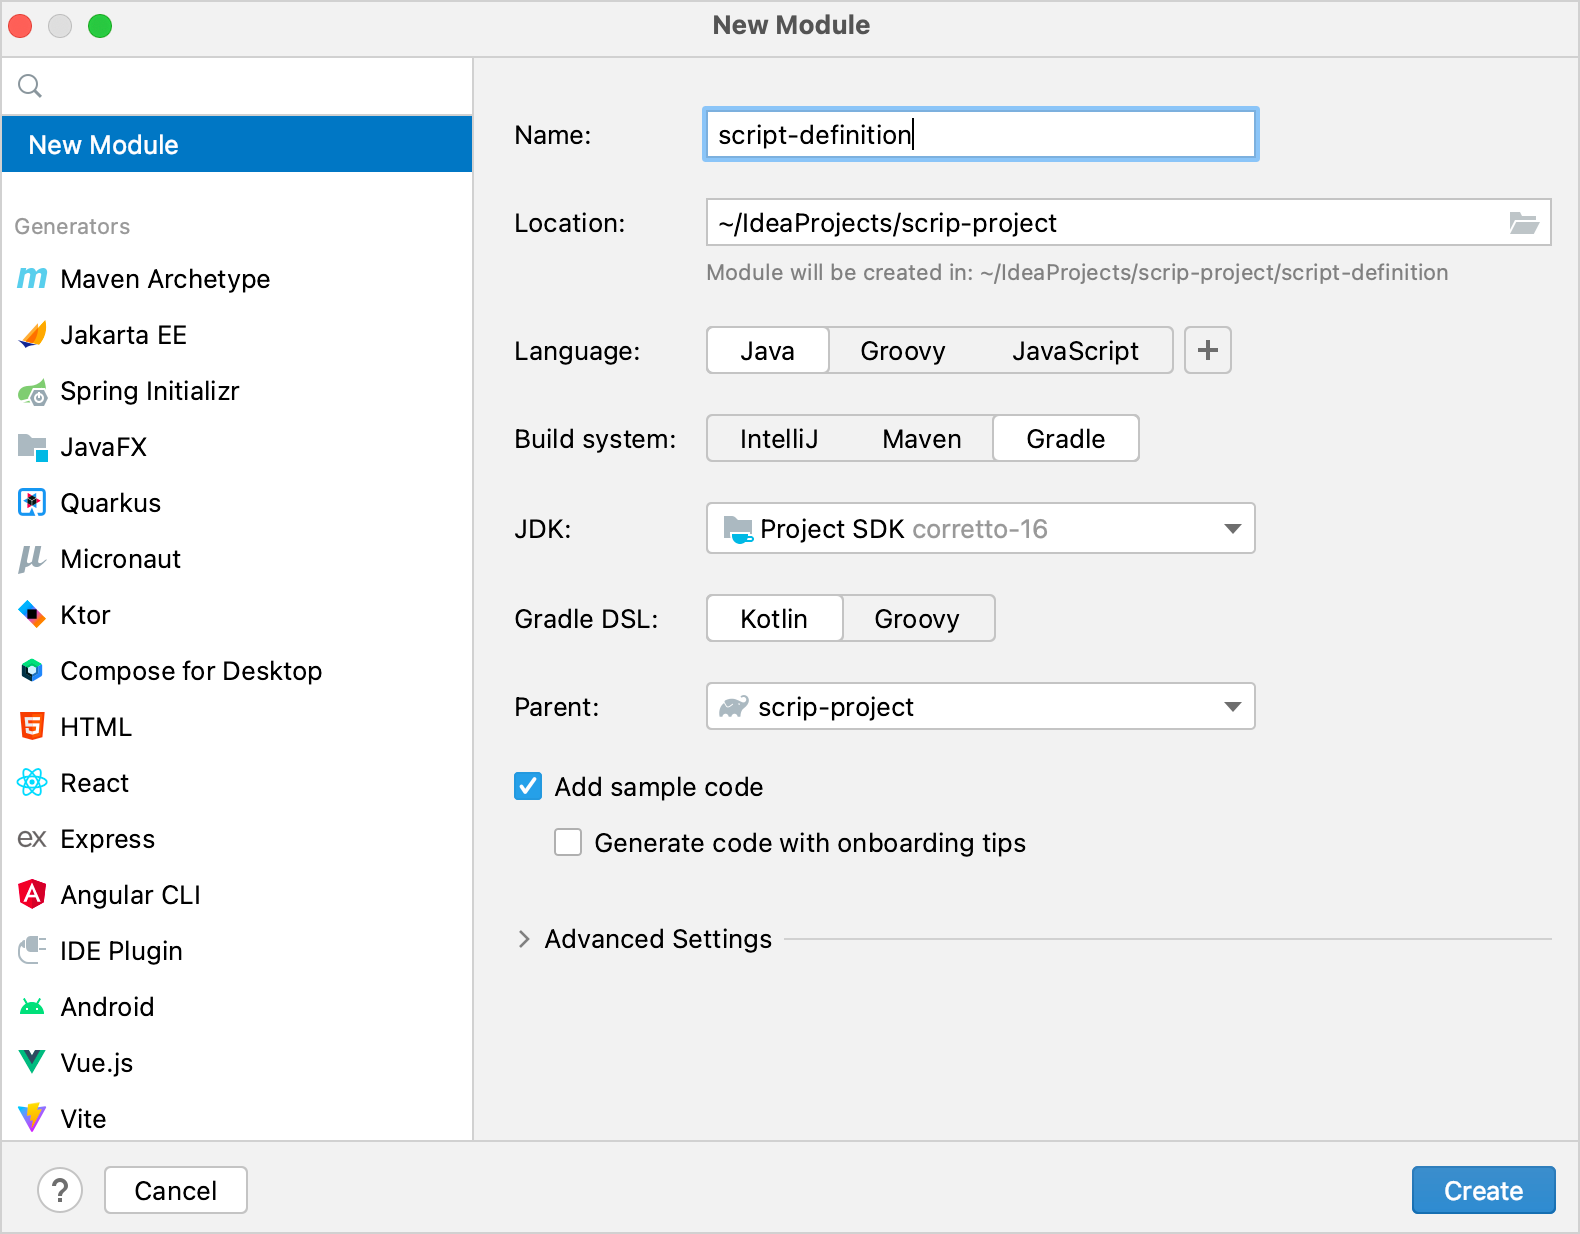
- 在 IntelliJ IDEA 中, 选择 File | New | Module.
- 在左侧面板中, 选择 New Module. 这个模块将是我们的脚本定义模块.
- 输入新模块名称, 如果需要, 修改它的位置.
- 在 Language 列表中, 选择 Java.
- 选择 Gradle 构建系统, 如果你想要用 Kotlin 语言来编写构建脚本, 请为 Gradle DSL 选择 Kotlin.
- 对模块的父模块, 选择根模块.
-
点击 Create.
-
在模块的
build.gradle(.kts)文件中, 删除 Kotlin Gradle plugin 的version. 因为它在根项目的构建脚本中已经定义过了. - 再重复一次上面的步骤, 创建一个脚本主机模块.
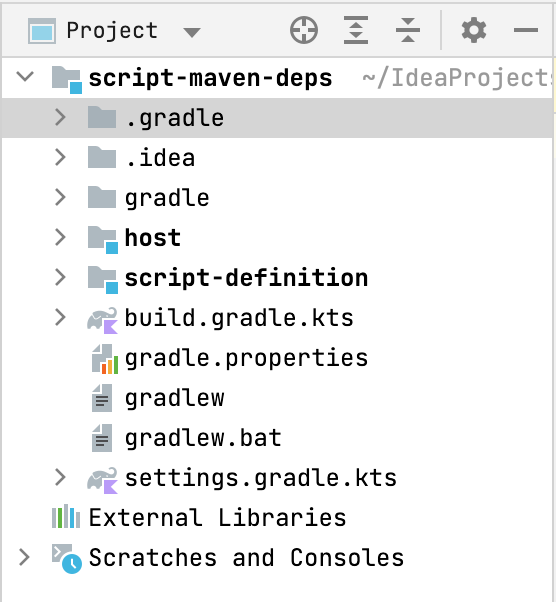
现在项目的结构应该如下:
请参见 kotlin-script-examples GitHub 仓库, 你可以找到一个这样的项目的示例, 以及更多 Kotlin 脚本示例.
创建脚本定义
首先, 定义脚本类型: 开发者能够在这个类型的脚本中编写什么代码, 以及这些代码应该如何处理.
在本教程中, 这部分包括在脚本中支持 @Repository 和 @DependsOn 注解.
-
在脚本定义模块中, 在
build.gradle(.kts)文件的dependencies代码块中添加 Kotlin 脚本组件的依赖项. 这些依赖项会提供你在脚本定义中需要的 API:dependencies { implementation("org.jetbrains.kotlin:kotlin-scripting-common") implementation("org.jetbrains.kotlin:kotlin-scripting-jvm") implementation("org.jetbrains.kotlin:kotlin-scripting-dependencies") implementation("org.jetbrains.kotlin:kotlin-scripting-dependencies-maven") // 对我们的脚本定义, 需要 coroutines 依赖项 implementation("org.jetbrains.kotlinx:kotlinx-coroutines-core:%coroutinesVersion%") }dependencies { implementation 'org.jetbrains.kotlin:kotlin-scripting-common' implementation 'org.jetbrains.kotlin:kotlin-scripting-jvm' implementation 'org.jetbrains.kotlin:kotlin-scripting-dependencies' implementation 'org.jetbrains.kotlin:kotlin-scripting-dependencies-maven' // 对我们的脚本定义, 需要 coroutines 依赖项 implementation 'org.jetbrains.kotlinx:kotlinx-coroutines-core-jvm:%coroutinesVersion%' } -
在模块中创建
src/main/kotlin/目录, 并添加一个 Kotlin 源代码文件, 例如,scriptDef.kt. -
在
scriptDef.kt中, 创建一个类. 它将是这个类型的脚本的基类, 因此要将它声明为abstract或open.// 这个类型的脚本的 abstract (或 open) 基类 abstract class ScriptWithMavenDeps这个类后面还会作为脚本定义的引用.
- 要让这个类成为一个脚本定义, 需要为它标注
@KotlinScript注解. 要向注解传递 2 个 参数:fileExtension– 一个以.kts结尾的字符串, 为这个类型的脚本定义文件扩展名.compilationConfiguration– 一个 Kotlin 类, 集成自ScriptCompilationConfiguration, 为这个脚本定义指定编译规格. 你将在下一步中创建这个类.
 // @KotlinScript 注解用来标注脚本定义类
 @KotlinScript(
     // 脚本类型的文件扩展名
     fileExtension = "scriptwithdeps.kts",
     // 脚本类型的编译配置
     compilationConfiguration = ScriptWithMavenDepsConfiguration::class
 )
 abstract class ScriptWithMavenDeps

 object ScriptWithMavenDepsConfiguration: ScriptCompilationConfiguration()
本教程中, 我们只提供能够工作的代码, 没有详细解释 Kotlin 脚本 API. 你可以在 GitHub 代码仓库 找到相同的代码, 包含详细的解释.
-
定义脚本的编译配置, 如下.
object ScriptWithMavenDepsConfiguration : ScriptCompilationConfiguration( { // 用于这个类型的所有脚本的隐含 import defaultImports(DependsOn::class, Repository::class) jvm { // 从上下文 classloader 抽取完整的 classpath, 并用作依赖项 dependenciesFromCurrentContext(wholeClasspath = true) } // 回调 refineConfiguration { // 使用指定的处理器来处理特定的注解 onAnnotations(DependsOn::class, Repository::class, handler = ::configureMavenDepsOnAnnotations) } } )configureMavenDepsOnAnnotations函数如下:// 即时处理编译的重新配置 fun configureMavenDepsOnAnnotations(context: ScriptConfigurationRefinementContext): ResultWithDiagnostics<ScriptCompilationConfiguration> { val annotations = context.collectedData?.get(ScriptCollectedData.collectedAnnotations)?.takeIf { it.isNotEmpty() } ?: return context.compilationConfiguration.asSuccess() return runBlocking { resolver.resolveFromScriptSourceAnnotations(annotations) }.onSuccess { context.compilationConfiguration.with { dependencies.append(JvmDependency(it)) }.asSuccess() } } private val resolver = CompoundDependenciesResolver(FileSystemDependenciesResolver(), MavenDependenciesResolver())完整的代码请参见 这里.
创建脚本主机
下一步是创建脚本主机 – 负责处理脚本执行的组件.
- 在脚本主机模块中, 在
build.gradle(.kts)文件的dependencies代码块中添加依赖项:- Kotlin 脚本组件, 它会提供你的脚本主机中需要的 API
- 你前面创建的脚本定义模块
dependencies {
    implementation("org.jetbrains.kotlin:kotlin-scripting-common")
    implementation("org.jetbrains.kotlin:kotlin-scripting-jvm")
    implementation("org.jetbrains.kotlin:kotlin-scripting-jvm-host")
    implementation(project(":script-definition")) // 脚本定义模块
}
dependencies { implementation 'org.jetbrains.kotlin:kotlin-scripting-common' implementation 'org.jetbrains.kotlin:kotlin-scripting-jvm' implementation 'org.jetbrains.kotlin:kotlin-scripting-jvm-host' implementation project(':script-definition') // 脚本定义模块 } -
在模块中创建
src/main/kotlin/目录, 并添加一个 Kotlin 源代码 文件, 例如,host.kt. -
为应用程序定义
main函数. 在它的函数体中, 检查它得到了 1 个参数 – 脚本文件的路径 – 然后执行脚本. 在下一步中, 你将会在单独的函数evalFile中定义脚本的执行过程. 现在我们只声明一个空函数.main大致如下:fun main(vararg args: String) { if (args.size != 1) { println("usage: <app> <script file>") } else { val scriptFile = File(args[0]) println("Executing script $scriptFile") evalFile(scriptFile) } } -
定义脚本的执行函数. 这里是你使用脚本定义的地方. 使用脚本定义类作为类型参数, 调用
createJvmCompilationConfigurationFromTemplate, 可以得到脚本定义. 然后调用BasicJvmScriptingHost().eval, 将脚本代码和编译配置传递给它.eval会返回ResultWithDiagnostics的实例, 因此请将它设置为你的函数的返回类型.fun evalFile(scriptFile: File): ResultWithDiagnostics<EvaluationResult> { val compilationConfiguration = createJvmCompilationConfigurationFromTemplate<ScriptWithMavenDeps>() return BasicJvmScriptingHost().eval(scriptFile.toScriptSource(), compilationConfiguration, null) } -
调整
main函数, 将脚本执行结果信息打印输出:fun main(vararg args: String) { if (args.size != 1) { println("usage: <app> <script file>") } else { val scriptFile = File(args[0]) println("Executing script $scriptFile") val res = evalFile(scriptFile) res.reports.forEach { if (it.severity > ScriptDiagnostic.Severity.DEBUG) { println(" : ${it.message}" + if (it.exception == null) "" else ": ${it.exception}") } } } }
完整的代码请参见 这里
运行脚本
要检查你的脚本主机如何工作, 需要准备一个要执行的脚本, 要需要一个运行配置.
-
在项目的根目录, 创建文件
html.scriptwithdeps.kts, 内容如下:@file:Repository("https://maven.pkg.jetbrains.space/public/p/kotlinx-html/maven") @file:DependsOn("org.jetbrains.kotlinx:kotlinx-html-jvm:0.7.3") import kotlinx.html.*; import kotlinx.html.stream.*; import kotlinx.html.attributes.* val addressee = "World" print( createHTML().html { body { h1 { +"Hello, $addressee!" } } } )它使用
kotlinx-html-jvm库中的函数, 这个库在@DependsOn注解的参数中指定. - 创建一个运行配置, 它会启动脚本主机, 并执行这个文件:
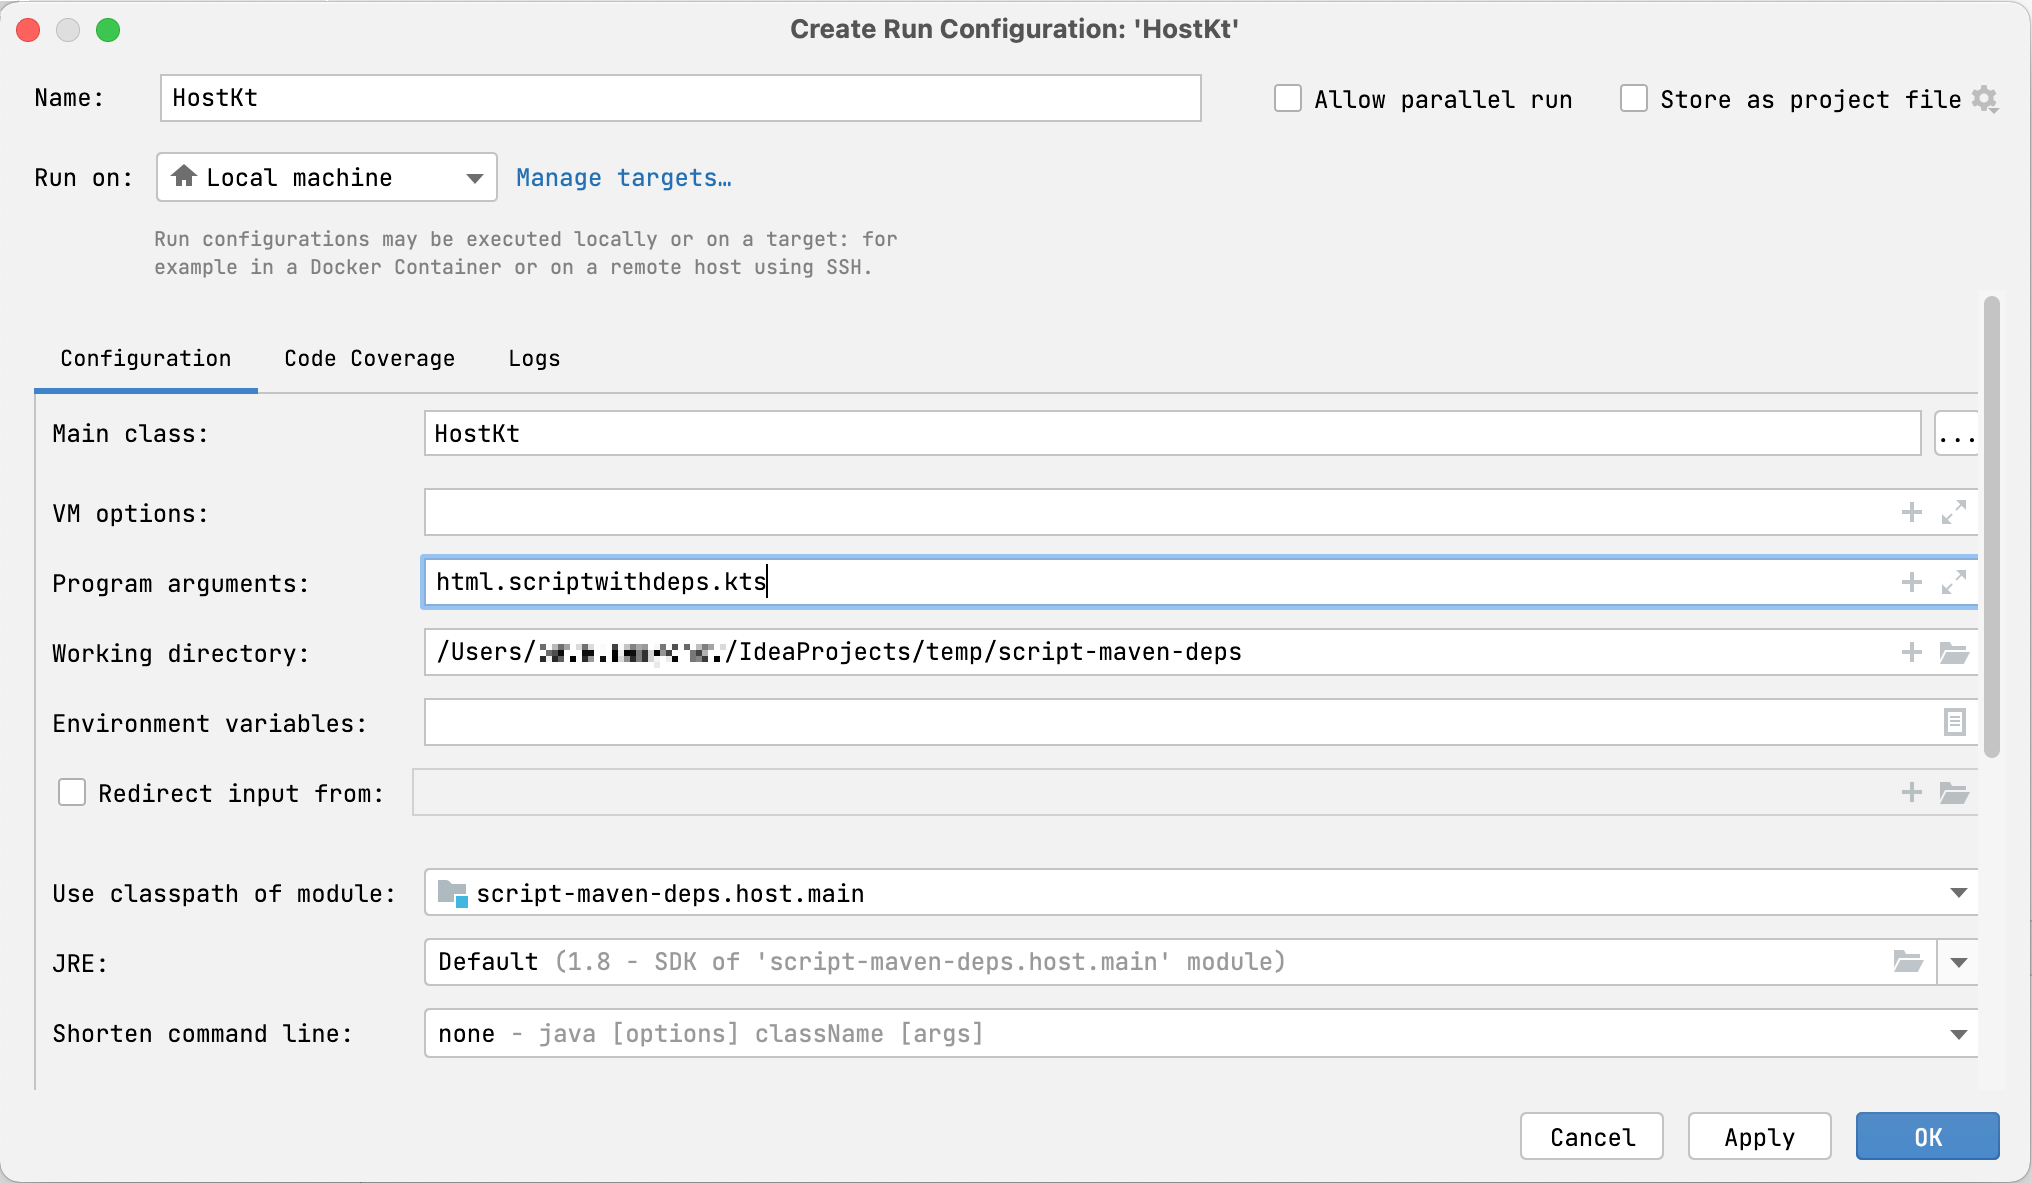
- 点击
host.kt, 找到main函数. 编辑器侧栏中的有一个 Run 图标. - 右击侧栏图标, 选择 Modify Run Configuration.
-
在 Create Run Configuration 对话框中, 在 Program arguments 栏添加脚本文件名, 并点击 OK.
- 点击
- 运行创建后的配置.
你将会看到脚本是如何执行的, 它会从指定的仓库解析 kotlinx-html-jvm 的依赖项, 并打印出它调用的函数的结果:
<html>
  <body>
    <h1>Hello, World!</h1>
  </body>
</html>
在第一次运行时, 解析依赖项会耗费一些时间. 之后的运行会更快结束, 因为会从本地 Maven 仓库使用已经下载好的依赖项.
下一步做什么?
你已经创建了一个简单的 Kotlin 脚本项目, 下面可以学习关于这个问题的更多内容:
- 阅读 Kotlin 脚本的 KEEP
- 浏览更多的 Kotlin 脚本示例
- 观看 Rodrigo Oliveira 的 实现 Gradle Kotlin DSL 演讲